Wednesday, March 28, 2012

ICE cream!

All I wanted was some ice...

  We visit my mom frequently during the week, and my ice coffee addiction means that I am always making ice coffee at her house. I love ice in all of my drinks, and honestly, it has become a mandatory necessity in all my drinks. The thought of plain tepid tap water with no ice makes me cringe.

  The problem with my moms refrigerator is that it is constantly running out of ice.  So the other day when I smushed my glass into the door dispenser and no ice appeared I wasn't surprised. "Oh no" I thought, "Now I am going to have to drink regular warm coffee like everyone else". I was starting to feel desperate, little beads of perspiration where forming on my forehead at the thought of drinking a warm beverage, so I decided to take drastic measures. I opened the freezer door to fish around in the ice maker drawer for what might be the last few stray cubes in the hopes that it would be just enough for my one glass of ice coffee.

  Just last Sunday we had all gotten together for our big family dinner. It's what we do on Sundays. We go to church and then seven of us meet at my mother's house for a big lunch/dinner in the afternoon followed by a gluten-free diary-free dessert. That particular Sunday we were enjoying Golden Garbanzo Goodies. It has become a real favorite in our family - everyone loves it, even my father who is the pickiest of eaters. Someone in the group had the bright idea to top these delicious wonders with ice cream. I mean....isn't everything better with ice cream on top? Of course.

  The men in the family usually devour these garbanzo treats right out of the oven. I remove the dessert from a piping hot oven, carefully set the pan on a trivet on the center island, turn around to close the oven door....and there they go, the pan is empty.  Somehow on this particular day we managed to hold the hungry swarm off just long enough to let the pan cool down, slice them into cute squares, and attempt to top them with ice cream. Sadly our tiny pint of ice cream didn't stretch very far, and there were still a few plates left un-topped. "Surely" my dad said "there is more ice cream, I bought 2 containers!" My brother looked through the freezer, but found nothing (as usual for a teenager). Apparently we were all starving on a desert island because panic ensued. Everyone had to take their turn looking through the freezer, because surely it must be there. No one could find the missing ice cream and we eventually determined that my dad was delusional and never bought "2 containers!" to begin with.

  We stretched the ice cream so that everyone got a little bit, and we happily ate our snack and moved on with our day.

  Fast forward several days to the lack of ice incident. "How long has your ice maker been like this?" I asked my mom. "Oh, a couple days" she responded, thinking nothing of it. As I fished around in the drawer for what I hoped would save my dream of the perfect creamy glass of ice coffee, I found the culprit. 


  I laughed out loud when I removed the whole ice drawer to find what had been clogging up the works.
It was the missing 2nd container of ice cream that we had gotten all worked up about the past weekend. My dad was right, he did in fact buy a second container. My brother was right, I could see why he was unable to find the missing ice cream. And I was correct that this ice maker was definitely not working!
  After laughing for a few minutes. My mother and I thought about how we might get this wedged container out of its predicament. We tried turning the gear...nothing.... tried to push it loose...nothing. "Well" I said, "Let's just get two spoons and eat this thing free!" This didn't seem like a logical possibility considering it was 10am. 
  Eventually the smashed ice cream thawed a bit and we wiggled it free. We had a good laugh about it. Subsequently I did find a few stray ice cubes in the drawer, and I made a delicious tall glass of ice coffee and the day was saved.


Tuesday, March 27, 2012

Ice Cream Cookie Sandwiches

Gluten-Free!!

I have really been enjoying these gluten-free chocolate chip cookies. Honestly they turn out better than any regular chocolate chip cookie I've made in the past. We keep the dough already formed into balls in the freezer so that we can crank out warm chocolatey goodness at a moments notice. My toddler loves them too.
It's been getting hot around here as the weather turns warmer and my mind turns to all the delicious summer treats I could make this year. Last summer we had a big party when my daughter turned two, and with all the different food allergies and sensitivities in my family the idea of a birthday cake that would keep everyone happy was absolutely daunting. I got so dizzy by the idea of a gluten, dairy, sugar-free cake that I gave up on the idea of cake altogether. Instead we had and ice cream bar, everyone loves ice cream after all, and everyone can choose their own flavor or type. We had coconut milk ice cream, sugar free ice cream, and traditional ice cream too, along with an array of different topping so guests could personalize their creations to their hearts content. Everyone loved it, and no one was asking "where's the cake?"

This year I am considering adding these adorable ice cream treats to our new birthday tradition for those like me who need to eat gluten-free.


Ingredients:
baked gluten free chocolate chip cookies (2 for each sandwich you want to make)
ice cream of your choice
sprinkles for topping


Directions:
Once the cookies are baked, let them cool and put them on a plate in the freezer. Once they are very chilled spoon about 3 Tbsp of ice cream onto the bottom of a cookie and squeeze together with another cookie. Easy! Now, roll the edge in a plate of sprinkles. Then return treats to the freezer to harden completely. Leave them in the freezer until you plan to enjoy them, which will probably only be a few minutes.


Monday, March 26, 2012

Italian Stuffed Chicken

gluten-free

Still trying to think of something to do with your homemade pesto? Here is a delicious and simple chicken recipe that everyone will love.

Ingredients:
6 chicken breasts - boneless skinless
1/2 cup homemade pesto
1 6oz jar sun-dried tomatoes in oil
1 cup diced Fontina or Gouda cheese
salt & pepper

Directions:
Begin by using a knife to cut through the center of the chicken breast and butterfly them open. Next on one side of the butterfly-ed chicken spread 1 Tbsp of pesto. Drain the tomatoes of their oil. Top pesto with a few pieces of  sun-dried tomatoes and a few pieces of the cheese. Repeat for the rest of the chicken. Be careful not to spread your ingredients on the chicken and return the utensils to your jar - this can contaminate leftover pesto, tomatoes, or cheese. Measure out just the ingredients you will use for this recipe and discard any leftovers that may have touched the chicken.
Next roll  up the chicken so that all of the ingredients are tucked inside and place in a baking dish seam side down. Sprinkle with salt and pepper. Bake in a 350 oven for 30-35 minutes or until completely cooked through.
Remove the chicken from the oven and let cool before slicing and serving. This dish is a great dinner option that you can serve with pasta and veggies, it also makes a great topping for a green salad.
Enjoy!


Saturday, March 24, 2012

Homemade Basil Pesto

gluten-free

If you are not eating pesto on a regular basis than you are missing out. It is so herb-y and delicious, and it's easy to make your own. If you are thinking about starting a garden this spring be sure to add some basil plants to your cart at the nursery. Then you can make this homemade pesto and enjoy fresh tasting basil goodness all summer long.

Ingredients:
3 cups fresh basil leaves
3/4 cup toasted pine nuts
4 whole garlic cloves
1/2 cup grated Parmesan cheese
1 cup olive oil
salt and pepper to taste

Directions: Place all of the ingredients above in your food processor except for the olive oil and cheese. Pulse until all ingredients are finely minced. Slowly drizzle in olive oil while food processor is running until you reach a sauce like consistency. You may need a little more or less olive oil. Last add in the Parmesan cheese and pulse just a few times to incorporate.

Now...how can you use this pesto?

Pesto is delicious with pasta, with chicken, with salmon, and with risotto. You can dip bread in it (only if it's gluten free of course) and use it at a sandwich or panini spread (again only if you are using gluten-free bread). You can use it to flavor a fresh tomato salad or as a topping to a vegetable soup. The possibilities are numerous. However you decide to use your pesto try to mix it in during the last minutes of cooking or even after the dish is finished cooking. This will keep the pesto bright and fresh.

And...how can you store your homemade pesto?

Pesto is very freezable. I suggest spooning your pesto into an ice cube tray and freezing the mixture into small blocks, then transferring to a freezer bag. Then just thaw what you need for a specific recipe. You can also keep your pesto in the refrigerator. To keep the pesto brown oxidizing, keep in an airtight container with olive oil drizzled on top. If your pesto does oxidize on top it is still fine to use. Fresh homemade pesto will keep in the fridge for about a week, and in the freezer for 6 months. If I grow basil in the summer, none of it goes to waste, and all of the basil at the end of the season ends up in a big batch of pesto that gets stored in the freezer.

By making your own, you can adjust the pesto ingredients to your specific tastes. Remember, everything tastes better when it's homemade. Enjoy!


Friday, March 23, 2012

Slowcooker Sesame Chicken


My husband loves sesame chicken. When we go out to a Chinese or Thai food place, I know he is going to order the sesame chicken, and I am going to get sauteed chicken and broccoli with white sauce. The dishes come to the table and I desperately want to try some of his dish, but the deep fried flour coating keeps me at bay. Plus I know many of the brown sauce dishes at oriental restaurants have soy sauce, which is off limits to gluten-free eaters. It has become increasingly difficult to eat out, and more and more I want a delicious restaurant style dish at home that is gluten-free, of course. To be honest this sesame chicken made in the crock pot turned out even better than I expected. Even though this shredded chicken doesn't have the same fried texture, it has all the Asain flavor you would expect. I know you will love it too!

Ingredients
  for the sauce:
1 cup honey
1/2 cup tamari
1 Tbsp toasted sesame oil
1 whole diced onion
1 Tbsp minced fresh ginger
1/2 cup plain tomato sauce
1 tsp salt
1/2 tsp pepper
pinch of garlic powder

6-8 chicken breasts (boneless skinless)
sesame seeds and chopped green onions for garnish
cooked white or brown rice for serving
4 Tbsp cornstarch
1/4 cup water


Directions.
In your slow cooker mix together all of the sauce ingredients. Be sure everything is completely mixed. Add the whole chicken breasts and mix to make sure the sauce coats all surfaces. Cook on low for 4 hours or until chicken is completely cooked through and soft.
When the chicken is completely cooked remove the chicken pieces to a cutting board and shred with two forks. In a small cup mix together 4 Tbsp of cornstarch and a little bit of water. Pour cornstarch into the remaining sauce in the slow cooker. Put the lid on and turn on high heat. Let the sauce come to a slow boil to thicken. If your slow cooker doesn't heat the sauce enough to thicken, pour sauce into a saucepan and complete this step with the cornstarch on your stove top. Then once sauce is thickened pour back into your slow cooker. Add the shredded chicken to the sauce and keep the slow cooker on warm until ready to serve.
To serve spoon shredded chicken and sauce over cooked rice and garnish with a sprinkle of sesame seeds and chopped green onions.
Enjoy!

Thursday, March 22, 2012

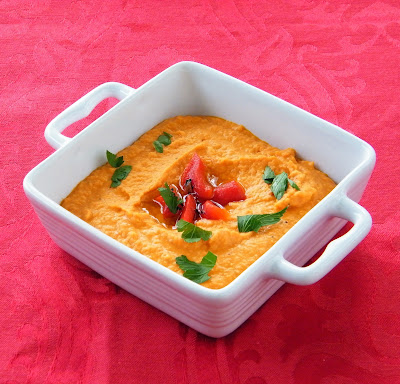
Red Pepper and Sun Dried Tomato Hummus

gluten and dairy free

A crowd pleasing snack you can mix up with just a few minutes in the food processor. You can add all sorts of different flavors to a basic hummus recipe, and lately I have really enjoyed the combination of roasted red peppers and sun dried tomatoes.

Ingredients:
2 15oz cans of garbanzo beans (chick peas)
3 cloves of garlic
1/2 lemon juiced
2 tsp salt
1/3 cup roasted red pepper diced
1/4 cup drained sun dried tomatoes
1/4 cup tahini (ground sesame seeds)
1 tsp cumin
1/2 tsp pepper
1/4 cup olive oil

Directions:
Drain and rinse the beans. Add them to a food processor. Add the garlic and lemon juice. Pulse to break up the beans. Add remaining ingredients except for the olive oil. Pulse until all ingredients are incorporated. Slowly drizzle in the olive oil while the food processor is running until the hummus is a thick and creamy texture. Enjoy with dip-able gluten free snacks such as tortilla chips, carrot and celery sticks.


Wednesday, March 21, 2012

Taco Soup

gluten-free

March is a tricky month, some days are so warm and a sunny, while others can be downright dreary. Today was one of those dreary days, while it was not particularly cold, it was gray, wet, and misty outside. On these unexpected weather days it can be so easy to whip up this delicious soup right in the slow cooker with pantry staples and ingredients you might already have on hand. Beans are a must have staple for every gluten-free home. Everything except for the onion and bell pepper, I already had in my pantry stash. This can also make a wonderful gluten and dairy free meal just by leaving off the toppings.

Ingredients:
2 lbs ground beef
1 15oz can kidney beans
1 15oz can pinto beans
1 15oz can black beans
1 red bell pepper
1 onion
1 small can green chillies
1 can corn kernels
1 packet taco seasoning
1 tsp ground chipotle peppers
2 tsp salt
2 tsp cumin
2 tsp Mexican style chili powder
32 oz chicken stock
Optional Toppings: cheese, sour cream, cilantro

Directions:
Dice the onion and the bell pepper. Add onion and bell pepper to the slow cooker. Drain and rinse all beans and add to the slow cooker. Drain corn and add to the slow cooker. Add all seasonings to the slow cooker. Turn slow cooker on high to get the ingredients started on the cooking process. Meanwhile brown the ground beef and drain the excess oil. Add the cooked ground beef to the slow cooker. Cover with the broth, stir, cover and cook on high for about 4 hours or until the soup has simmered and the ingredients have softened. Serve hot with your favorite toppings and tortilla chips. Enjoy! 


Monday, March 19, 2012

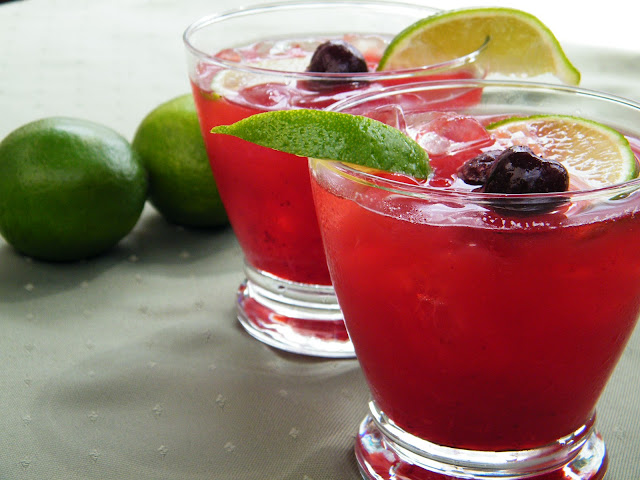
Cherry Limeade

sugar-free
A delicious sugar-free drink that we LOVE! It's sweet and tart and just so lovely. This is so perfect for spring and summer. We enjoyed this today while we sat on the deck in the sun. It's so easy to make, you can mix up this delicious drink in just a few minutes. You may never go back to strawberry lemonade.

Ingredients:
1 cup fresh squeezed lime juice
2 cups frozen cherries
enough water and ice to fill your pitcher
liquid stevia sweetened to taste - we used 4 tsp.

First juice the limes. Use an electric citrus juicer if you have one. I used about a dozen limes, but you may need less if yours are really juicy. You need 1 cup of fresh squeezed juice. Next in a food processor add 2 cups of frozen cherries and 2 cups of water. Pulse until the cherries are completely smooth. This will be like a slushy consistency. Add the frozen cherry mix and the lime juice in your pitcher, fill the rest with water and ice. Add the liquid stevia to your desired sweetness. Enjoy!


Sunday, March 18, 2012

Chocolate Pudding with a secret ingredient

gluten free, sugar free, low carb

This chocolate pudding is so rich and creamy, and no one will ever know that it's made with a few simple ingredients including avocados! I know it's not traditional, you would never imagine that this actually tastes good, it's like the Golden Garbanzo Goodies, an unusual ingredient that no one will ever guess because the final product is so delicious. After making these today my husband came home and saw them in the fridge and was so excited. He devoured it right after dinner, never suspecting it was made with avocados and didn't even have any sugar in it! If you are trying to go low-carb then this is the perfect treat.

Ingredients:
3 perfectly ripe avocados
1/2 cup cocoa powder
1/4 cup heavy cream
2 tsp vanilla cream liquid stevia
1 tsp vanilla extract
1/2 tsp almond extract

Whipped Cream:
1 cup heavy whipping cream
splash of vanilla cream liquid stevia


Directions:
In a food processor add all of the pudding ingredients. Blend until completely smooth. Add more sweetener if you'd like. That's it! No cooking required.

In a mixing bowl add cream and stevia. Whisk on high speed until you get soft peaks.

In serving dishes layer pudding and whipped cream. Top with a dusting of cocoa powder and with a few almonds or berries if you have them.
Hope you love this as much as we do!


Friday, March 16, 2012

Happy Saint Patrick's Day!

I am part Irish, and so is my husband. My husband's great-great-grandfather immigrated from Ireland in the late 1880s at the age of 15 by himself  and went on to be a great American cowboy.  After getting off the boat, he rode the train out West before jumping on a stage coach to the Oklahoma territory where he worked on his Uncle's ranch.   He lost his hat while traveling to Oklahoma - a must have item for any cowboy.  But he didn't have money to buy a new one so a store owner loaned him a hat until he could earn enough money to buy his own.    He became a well-known and respected cowboy and later a successful banker. 


Even though we are part Irish, I must admit we haven't cooked any traditional authentic Irish foods. When I think of Irish food, the quintessential ingredients that come to mind are potatoes and cabbage. Earlier this week I shared on of my favorite potato recipes for Creamy Potato Soup. Today I made these delicious Cabbage Rolls stuffed with a mixture of ground beef and rice. This is the first time I've made these and they were so delicious!

Ingredients:
1 large whole cabbage
2 lbs ground beef
1 cup cooked white rice
1/2 onion finely diced
1 whole egg
1 tsp dried basil
1 tsp garlic powder
1 jar of your favorite marinara sauce

First carefully remove the leaves of the cabbage one by one, if they are particularly tight you can cut them away from the base of the cabbage first then peel them off. You will need about 12-15 large cabbage leaves. Once you get to the center of the cabbage with the small thick leaves just chop these up and save for your Garden Vegetable Soup...that's what I did. Boil the leaves whole in a large pot of boiling water for 5 minutes. Then remove and set aside to drain and cool.
Next in a mixing bowl mix thoroughly all the remaining ingredients except for the sauce. Place a heaping spoonful of the mixture into the center of one cabbage leaf. Fold in the sides then roll up the leaf. Think of wrapping the mixture like you would a burrito. Place in a 9x13 baking dish (or smaller individual baking dishes) seam side down. Repeat until you have used all of the ground beef mixture.


 Next add 1 cup of water to the bottom of the baking dish. This will help the cabbage to steam. Cover the cabbage rolls with your favorite sauce. Bake in a 350 oven covered for 1hr and 15 minutes or until the cabbage is tender and the meat is cooked through.


I hope you enjoy these as much as we did! And to my readers in Ireland - Please share some of your favorite traditional Irish foods.


The Whole Garden Vegetable Soup

While the weather here in the northeast has been particularly nice this week, I am still finding it hard to let go of soup season. Here is a delicious pot of veggie soup to help you bridge the gap into summer salads. After all summer will be here before you know it, let's enjoy this hot soup while it lasts. With a mix of 10 different veggies this healthy soup is sure to make you look forward to starting your garden or other outdoor activities just around the corner.
This recipe makes a LARGE pot of soup, so be prepared.

Ingredients:
1 whole yellow onion
1 whole red onion
2 large carrots
1 whole zuchinni
1 whole yellow squash
6 baby bella mushrooms
1 whole red pepper
2 cups fresh green beans
1 cup chopped cabbage
2 cans diced tomatoes
5 minced garlic cloves
3 Tbsp chopped fresh chives
3 Tbsp chopped fresh basil
2 32oz boxes of chicken broth
(if you want a vegetarian soup sub for vegetable broth)
salt & pepper

Directions:
Be sure all veggies and herbs are thoroughly washed. Dice both onions. Peel and chop carrots into rounds. Cut zucchini and yellow squash lengthwise then slice into half moon shapes. Slice mushrooms. Dice the red pepper. Cut the ends off of the green beans, then cut the beans in haves or thirds. Chop the cabbage. Mince the garlic cloves. Chop the herbs.
Now that you are completely exhausted from all of the veggie preparation let's get the soup started...
First add 1 tbsp of olive oil to a large soup pot or dutch oven. Add onions, peppers, carrots, and green beans. Let these four veggies cook first for 20 minutes stirring occasionally, because they will take the longest to cook. Next add the cabbage, garlic, zucchini, and yellow squash. Cook for another 10 minutes stirring occasionally. Last add the tomatoes, herbs, salt & pepper to taste, and cover wtih chicken broth. Simmer the soup until the veggies are soft to you liking. Enjoy!


Thursday, March 15, 2012

Greek Salad

gluten free


Ingredients:
1 english cucumber
1 pint cherry tomatoes
1/2 large red onion
1/4 cup crumbled feta cheese
1/4 cup sliced olives
salt & pepper

Dressing:
1 Tbsp dijon mustard
1 Tbsp red wine vinegar
2 tsp dried basil
2 tsp dried oregano
1 tsp onion powder
pinch of garlic powder
1/4 cup olive oil
 
Mix together with a whisk all of the dressing ingredients in a small mixing bowl and set aside. Quarter long ways the cucumber. Remove the seed and slice. Cut the cherry tomatoes in half. Dice the red onion. Add cucumbers, tomatoes, and red onion together in a mixing bowl and stir. Add dressing and mix. Put on a serving place and top with olives and feta. Sprinkle with salt and pepper. Enjoy!


Wednesday, March 14, 2012

Rice Pudding & Honey Soaked Raspberries

gluten-free

This is not your grandma's rice pudding. When I think of this dessert, inevitably I assume there will be raisins, but not this time.
This is so scrumptious. We do not eat this very often, but it is definitely on my list of top five desserts. The creamy sweetness of the rice pudding with the tartness of the raspberries is really something special. I actually made this for my husband back when we were dating years ago and it's still a hit.
This recipe will make 4 servings.

Ingredients:
1 cup fresh raspberries
3 Tbsp honey
1 3/4 cup milk divided
1 1/2 cup water
1 cup arborio rice
1/2 cup sweetened condensed milk
2 egg yolks
2 tsp vanilla
2 tsp cinnamon


Directions:
Warm the honey in a small bowl in the microwave for just a couple seconds. Mix in berries and set aside.
Combine rice, water, and 1 1/2 cups of milk in a deep skillet and cook over medium high heat until just simmering. Cover with a lid and reduce heat to low. Cook until all the liquid is absorbed and rice is soft. This will take about 30 minutes. Stir about every 5 minutes or so.
While the rice is cooking, in a separate bowl combine sweetened condensed milk, remaining 1/4 cup milk, 2 egg yolks, and vanilla. Whisk to combine.
When the rice is finished cooking turn off the heat, add some of the rice mixture to the egg mixture while stirring. This will temper the eggs so they do not scramble when you add them back to the larger pan. Slowly add the egg mixture into the rice pan while stirring. Turn the heat back on medium low and cook while stirring continuously until the rice pudding thickens. This will take about 5 minutes. Remove from heat and add cinnamon. Serve warm in individual containers topped with a sprinkle of cinnamon and some of the honey soaked raspberries. Enjoy!


Tuesday, March 13, 2012

Creamy Potato Soup

gluten-free

This is a delicious soup brimming with all the toppings you could ever want. Today was an especially warm day, and with the warm weather comes the end of the hearty soup season. I imagine this might be the last time I enjoy this creamy soup until there is a crisp in the air again. This is basically all of my favorite ingredients together in a bowl. If you love a loaded baked potato, then you will love this too.

Ingredients:
2 1/2 lb. golden Yukon potatoes
1/3 cup white rice flour
4 Tbsp butter
6 cups milk
2 cups sharp cheddar cheese - grated
2 tsp salt
1 tsp pepper

Toppings:
2 green onions - chopped
2 Tbsp chopped chives
4 strips of bacon cooked and crumbled
1/4 cup grated cheddar cheese

Directions:
    First Peel and quarter the potatoes. Place in a large stock pot and cover with water. Bring water to a boil and cook for 20 minutes. Make sure potatoes are fork tender, then drain them.
In the same pot, now empty, melt butter and mix with flour. When both are incorporated add small amount of milk and whisk together. Add more milk and repeat. Then add the rest of the milk, whisk so there are no lumps. If you have a problem with flour lumps at this point, you can blend the soup with a hand blender if you have one. Heat the milk, butter, flour mixture over medium high heat with stirring frequently until soup is hot and thick. Add the 2 cups of cheese and the cooked potatoes. Serve in individual bowls and top with the toppings of your choice. Serve hot and enjoy!.


Friday, March 9, 2012

Strawberry Blueberry Bake

gluten-free

This is a yummy treat that is so quick and easy to whip up. We made it this afternoon, and it literally took minutes. Plus anything fruity and warm to melt ice cream over is always a crowd pleaser.
We made this today because we are having a group of people over for dinner from our church. Tonight we are also having gluten-free meatballs  with brown rice pasta and spinach artichoke dip.


Ingredients:
4 cups fresh strawberries hulled and halved
2 cup frozen or fresh blueberries
(or several cups of berry mix of your choice)
1/2 cup sugar
3-4 Tbsp corn starch

Topping:
1/4 cup gluten free all purpose flour
1 cup gluten free oats
1/2 cup brown sugar
1/2 cup butter - cubed
2 tbsp cinnamon
1 cup sliced almonds (optional)
your favorite ice cream for topping

Directions:
Mix together the first 4 ingredients in a mixing bowl. Anything that starts out looking like this is bound to be good.


Next Mix together the flour, oats, brown sugar, butter, and cinnamon in a bowl. Use a fork or pastry cutter to cut in the butter. The butter can still be in small chunks.
Sprinkle topping over the fruit mixture in a baking dish.
Bake for 40 minutes at 350 or until bubbly and brown on top.
Remove from oven and let cool slightly before serving in individual dishes with ice cream on top.  Enjoy!


Thursday, March 8, 2012

Berry Breakfast Smoothie

gluten-free

This really is what we eat for breakfast all the time. It's super simple to make and my toddler loves it. It has 100% of your daily value for vitamin C so you can skip the orange juice plus get 20g of protein. As a bonus it doesn't have nearly the amount of sugar that you would find in a typical smoothie. Serves 2.

Ingredients:
6 whole hulled strawberries
1/2 cup frozen blueberries
1/2 cup frozen peach slices
1 whole banana
1/2 cup plain Greek yogurt
2 Tbsp almond butter
1/2 cup milk
vanilla cream liquid stevia to taste (we use about 2 tsp)

Directions:
Put everything in the blender together (except the banana peal of course) and blend until smooth. Pour into two glasses and enjoy.


Wednesday, March 7, 2012

Vegetable Stir Fry

gluten-free and dairy-free

This is my go to stir fry recipe. After first trying to eat gluten-free I was surprised to learn that most Asian food is not gluten-free because of soy sauce. I continue to be surprised as I find hidden gluten in unlikely places. This recipe has all the oriental flavor you would expect but is made gluten-free by using tamari.
Tamari is a delicious sauce - which taste very similar to soy sauce - but it is made from soybeans instead of wheat. You can find it in most grocery stores near the soy sauce.

Ingredients:
1 red bell pepper
1 small crown brocolli
1 large carrott
5 baby bella mushrooms
2 green onions
5 baby bok choy
1 Tbsp olive oil
1 Tbsp minced fresh ginger
1 Tbsp minced fresh garlic
3 Tbsp tamari
1 Tbsp honey
2 tsp toasted sesame oil
1/2 lime squeezed
1 small package of Asian style rice noodles
1/4 cup peanuts
2 Tbsp chopped fresh cilantro

Directions:
First in a large mixing bowl place the noodles. Pour boiling water over them in the bowl - enough to cover them - and let them sit in the water while you cook the vegetables.
Next in a large wok or deep skillet heat 1/2 cup water over high heat. While the pan is heating thinly slice the red pepper and carrot and cut the broccoli crown into florets. Add broccoli, red pepper, and carrots to the pan. Cook them in the 1/2 cup boiling water until the water dissolves. These are the vegetables in this dish that take the longest to cook - and the boiling water gives them a little head start.
While the broccoli, red pepper, and carrot are starting to cook, mince the garlic and ginger, chop the green onion, slice the mushrooms, and chop the bok choy. Once all the water has cooked out of the pan add the olive oil and remaining vegetables, ginger, and garlic. Cook over high heat stirring frequently. Once all the vegetables are hot and slightly softened add tamari, honey, sesame oil, and lime juice. Stir all of the veggies and sauce together.
Strain the noodles of all of the water, and add the noodles to the pan. Mix to incorporate. Turn off the heat. Top individual servings with nuts and cilantro. Enjoy!

Tuesday, March 6, 2012

Breakfast Tacos gluten-free


If you are living gluten free like me, then you know how hard it is to eat breakfast. It seems like every scrumptious breakfast item that comes to mind is full of gluten: bagels, donuts, english muffins, pancakes, waffles...the list goes on and on. Usually I have a breakfast smoothie, which I will share the recipe for in a later post. Eggs have never really appealed to me, until now. These breakfast tacos are a great way to make eggs extra delicious. Plus they fill you up right in the morning to get you through your day.

Ingredients:
6 corn tortillas
3 eggs
2 Tbsp half and half
salt & pepper
6oz. loose sage sausage
1 small jar roasted red bell peppers
1/4 cup cheddar cheese - shredded
1/4 cup sour cream
cilantro for topping


Directions.
Cook and crumble the sausage and set aside. Whisk together the 3 eggs with half and half, add salt and pepper to taste. Cook and scramble the eggs in a non-stick pan and set aside. Remove roasted red pepper from jar and slice thinly and set aside. Heat 1 cup of canola oil in a deep skillet over medium heat. Once the oil is hot add the corn tortilla one at a time. Cook 15 seconds on each side. This makes the corn tortillas more flexible and chewy. Blot the tortillas on paper towels and assemble with directions below:


Option #1 Assemble and Eat
While the tortillas are still hot, and the other ingredients are still warm: On each tortilla place 1 Tbsp of loose crumbled cooked sausage, 1 Tbsp of scrambled egg, a few slices of red pepper and a pinch of cheddar cheese. Place on serving dish seam side down. Top with sour cream and chopped cilantro enjoy immediately!

Option #2 Feed a Crowd
You can double this recipe to make 12 tacos which will fill a 9x13 baking dish. Roll and place in baking dish seam side down. At this point you can cover them with plastic wrap and place them in the fridge. When you are ready to eat them top with more cheese and bake in the oven at 350 for 20 minutes or until heated through. Remove from the oven add a little sour cream and cilantro to the top, serve and enjoy!

Option #3 Freeze for later
These tacos are great from the freezer. If you have no time in the morning to make a hot breakfast than this is a great option. Prepare ingredients as above - you can double or triple the ingredients depending on how many you want to make. After heating the tortillas, on each tortilla place 1 Tbsp of loose crumbled cooked sausage, 1 Tbsp of scrambled egg, a few slices of red pepper and a pinch of cheddar cheese. You can freeze tacos individually or in a baking dish for a family sized meal. For individual tacos: roll and wrap taco in a paper towel, then in tinfoil. Repeat for remaining ingredients. When you want to reheat, remove from freezer, remove tinfoil, and microwave your taco for 1 minute inside the paper towel - and breakfast is ready. You can add sour cream at this point.
OR For a family sized meal: assemble the tacos, place them seam side down in a freezeable baking dish. Cover with tinfoil and freeze. When you are ready to reheat place the whole dish in the oven on 350 for 30 minutes or until heated through. Top with sour cream and cilantro.

Monday, March 5, 2012

Pumpkin Cake with Maple Glaze

gluten-free & dairy-free

I just tried to make this pumpkin cake today for the first time and it turned out wonderful! It is a very moist cake with just the right amount of spice. A perfect ending to a big family dinner.

Ingredients:
3 cups gluten-free all purpose mix
1/2 tsp. xantham gum
2 tsp cinnamon
1 Tbsp pumpkin pie spice
1/2 tsp salt
1 tsp baking soda
1 1/2 tsp baking powder
4 eggs
3 cups sugar
1/2 cup canola oil
1/2 cup applesauce
1 15oz. can pumpkin puree

Glaze Ingredients:
1/3 cup confectioners sugar
4 Tbsp. maple syrup
chopped walnuts (optional)


Directions:
Preheat oven to 350.
In a mixing bowl combine flour, xantham gum, spices, baking soda, and baking powder. Mix and set aside. In the bowl of the stand mixer add four eggs. Beat for 1 minute. Add the sugar and beat until sugar is dissolved. Add the oil, applesauce, and pumpkin and mix until incorporated. Slowly add the dry ingredients to the wet ingredients while the mixer is running on a slow speed. Pour the batter into an oiled baking pan and bake for 1 hour.
* You can bake this recipe in 1 bunt pan or 2 loaf pans*

Cool for 30 minutes before removing from pan. Cool completely before adding glaze, nuts, and serving.
To make the glaze mix together the sugar and maple syrup in a small mixing bowl until sugar is fully dissolved. Drizzle mixture over cake. Add chopped walnuts on top of the glaze if desired.
Enjoy!


Sunday, March 4, 2012

Strawberry Lemonade


Here is a delicious, refreshing drink to go with your Sunday dinner, or to enjoy on a hot day. It only takes minutes to whip up, and its sugar free!

Ingredients:
8 lemons
1 pint strawberries
water & ice
liquid stevia to taste

Directions:
Juice all 8 lemons and put the juice in the blender with the washed and hulled strawberries. Blend. Pour mixture in a pitcher. Add water and ice to fill the pitcher, then add liquid stevia to your desired sweetness. We use about 2 teaspoons. Enjoy!

Saturday, March 3, 2012

Broccoli Carrot Cheddar Soup gluten-free

This soup is delicious! My mom and I love to go to a popular soup place (which will remain nameless) and get their creamy broccoli cheddar soup. But, sadly, it's not gluten-free. Now I make this delicious soup at home - and I can control what goes into the pot. The addition of carrots to a traditional broccoli soup makes for a richer flavor. This is truly one of my favorite cold weather dishes.

Ingredients:
2 crowns fresh broccoli
4 large carrots
4 Tbsp butter
4 Tbsp white rice flour
32 oz. chicken stock
3 cups milk
3 cups cheddar cheese
2 tsp salt
1 tsp pepper
the tiniest pinch of nutmeg

optional toppings: cheddar cheese & sour cream

Cut the broccoli crowns into small florets. Wash and peel carrots. Cut carrots into thin slices or shred in the food processor. Combine Broccoli and carrots together in a large pot, nearly cover with water and bring to a boil. Cook until everything is soft, depending on the size of your veggies this may take 30 minutes.
Meanwhile, in a large soup pot or dutch oven melt butter and combine with rice flour. Cook mixture for 1 minutes while stirring. Slowly add chicken stock while using a whisk to break up any clumps from the flour. Add milk. Cook on medium high while stirring frequently. The mixture should thicken slightly after 20 minutes. If you want a thicker soup at this point you can add 4 Tbsp of corn starch mixed with a little water and continue to cook to desired thickness. Remove from heat. Add the cheddar cheese and mix to incorporate. The type of cheese you use is important in this dish because this is where a lot of the flavor comes from. I like to use a freshly grated cheddar as opposed to a pre-shredded cheese because I think it has a more sharp flavor.
Once the broccoli and carrots are soft strain them. Add them to the creamy soup base. Using a hand blender, blend the soup to your desired consistency. You can leave the soup more chunky, or blend until smooth. Top with the toppings of your choice.
Enjoy!